Which computer to operate a personal robot?
There is a choice between Raspberry, Arduino, Beagleboard and the Intel's Minnowboard, among many others.
First, we must clarify what is expected of the computer that will run the robot.
- It must be embedable. This implies a low power that can be activated with a battery. As a laptop without a screen or keyboard.
- It must interface with the sensors of the robot.
- It must have a development tool. Preferably with a GUI.
- An Ethernet interface to be connected to a desktop or laptop via a local network, this facilitates developments.
- PWM (Pulse Width Modulation). Converting a binary signal to analog, it allows you to control the speed of motors. The reverse operation can read the signal from a sensor.
- A current mobile computer does not have the required power to operate an android robot. It can only act as a relay to a remote computer. So you need a wifi connection for exchanging data and commands.
The Raspberry Pi corresponds to these criteria, it is the most common and the least expensive, so we will take it as a reference point, and compare it with competing products.
Raspberry Pi
It has a PWM output directly through a GPIO (General Purpose I/O) connector. We may need additional components between the connector and the peripheral device.
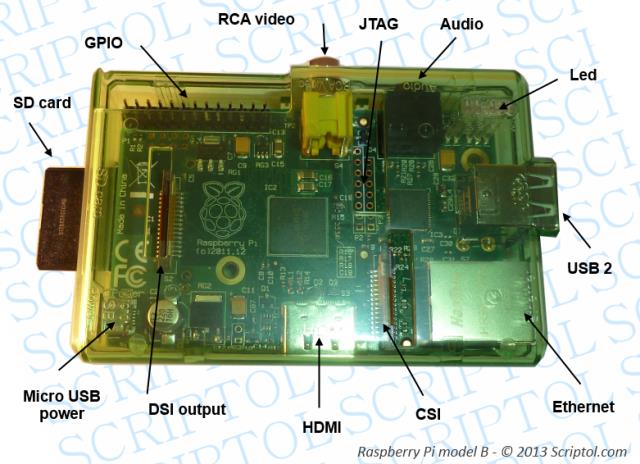
The image below shows a list of all the connectors for the RPi model B, in a transparent green case.

- GPIO connectors allows you to make assemblies, for example connecting a battery for a mobile power.
- The micro USB port gives it power from the network, with a charger (you can use a mobile charger).
- RCA output connects to a screen and the audio connector supports a 3.5 jack.
- The group of LEDs shows the status.
- Two USB 2 for keyboard and mouse in development mode. One can insert different dongles, including Wi-Fi.
- An RJ-45 port to connect to the Ethernet network.
- HDMI output for connecting a monitor.
- CSI connector to a camera or any other device providing images, or sensors. This can be used for pattern recognition.
- The DSI (Display Serial Interface) connector connects the board to an LCD display.
- SD to store the operating system and your data.
- JTAG to debug the card, but it is not very useful (nor well documented).
There are at least two very useful connectors for designing a robot, CSI and GPIO. But it is possible to use the USB port to connect the elements. All other connectors are used to program the board and control the operation of the program through the development interface.
The page RPi Verified Peripherals on eLinux would help to find the right devices for your RPi.
BeagleBone Black
In the same price range, with a similar processor and a memory of 512 MB also ...
- Powered by a USB port or a mini jack. This allows you to reuse a charger, providing it has a 5 V and 1000 amps at least ouput.
- One USB 2. Host as those of RPi.
- One mini USB client. Can be used for power.
- A serial port Serial Debug UART0. It allows you to communicate with the board. Requires a TTL interface.
- RJ-45 connector.
- Micro SD.
- Micro HDMI. No dedicated audio output, the sound can pass through the HDMI, but the robot does not move with a screen, so it's a limitation.
- Two CAN extension connectors. Give some freedom to connect devices.
- The spec shows three PWR access through doubtless the CAN connectors.
It does not have the same video processing capabilities that RPi, so not the same comfort of interface développemeent, but more GPIO connectors through the extension ports. Answers to problems will be less easily found than with the RPi, even if he has a good documentation. At the time I write this article, all ports are not functional and users are trying to make them active. This is a less finished product.
More information on BeagleBone Black in this PDF file.

Arduino
The Arduino card is much less powerful than the RPi. But it has advantages, it consumes much less power, it is compact and can even have the size of a postage stamp (in DigiSpark or Microduino model). It can connect to a Bluetooth or Wi-Fi card to receive orders from a more powerful computer that will handle all processing and send basic commands. We can consider using several cards together to enable different parts of the robot.
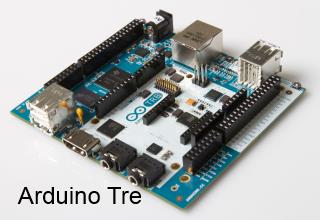
The Arduino TRE is a perfect alternative to Pi, maybe even higher, but is still in development at the time this article is published.
Minnowboard
It is less suitable for robotics. It is ten times more powerful than the previous. It does not have the ports typically used in robotics.
The board, next to the fact that it's bigger, is similar to the RPi. But the GPIO is replaced by an expansion slot, plus an eSATA connector. The latter is not very useful for a mobile device.
Its advantage is that it is fully open source and its components can be changed to alter its capabilities. This aims it more to the industrial world (and thus Intel positions it) to operate machinery that personal robots. The actual price is close to that of a notebook.
Using a mobile
Another solution is to use a mobile phone, if you want to pay the price. It is most powerful and has a screen, many programming tools.
It does not have the same connectors also you need to consider further adding an Arduino board. It can be connected to a movable On-The-Go USB. This removes the duality between the master-slave host port and client port and harbor into double feature, so can be controlled or control. A USB OTB cable can make the connection between the two devices.
Another option is a special card like the IOIO Mint of Adafruit designed specifically to add robotic connectors to an Android mobile.
Conclusion
There are more and more new similar products. The RPi always has the advantage of popularity, so more software, more support. This computer like competitors will not suffice to operate a humanoid robot. It must be seen as a learning tool to start with a simpler assembly. The next step is to use an Android mobile with one or more interface cards. The sensors of the Android will be used, and its communication abilities too. The name of the Android system will find its full justification!
Finally we can move to a set of Arduinos distributed in the body of the robot.

