Resynthesizer tutorial
Download and unzip the zip archive for Windows or the tar.gz file.
The readme file contains a description of controls, but too short, hence this tutorial.
Installing on Linux
Copy all the files into:
~/.gimp-2.8/plug-ins/
Installing on Windows:
For the version 2, rebuild the binaries with a C++ compiler.
Copy the files into:
c:\Users\username\gimp-2.8\plug-ins\
If you can not compile the plugin, you can use the previous version that comes with an installer. Download and extract the archive, run the executable and replace 2.6 by 2.8 in the suggested path.
Commands for using resynthesizer
A new command appears in the menu "Script-fu": Enhance.
It contains three lines:
Smart enlarge
Creates a new image from the selection.
Smart remove selection
Deletes an object framed by the tool selection and restores the background.
You can not select the sample, so it is better to use the filter described below.Deletes an object framed by the tool selection and restores the background based on what surrounds the object. We define the length of the radius.
We can not select the sample, so it is better to use the filter described below.
On Windows, the script has a bug and takes the top left corner of the image rather than what is around. There is a patch on Gimp.org.
Smart sharpen
Makes the image cleaner.
To use the Resynthesizer, you select a portion of the image, then click on one of these three options.
The resynthesizer filter

It is located in the menu:
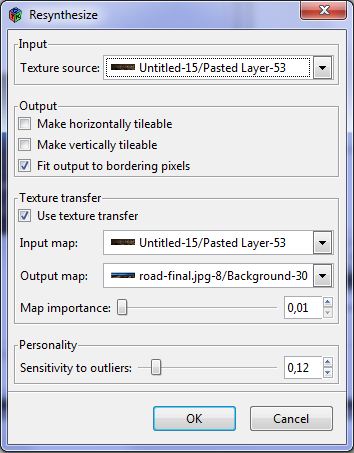
Filter -> Map -> Resynthesize...
The filter can create a texture, usable as a tile or delete an object as does the command "smart remove selection".
But it also allows to select the sample.
Options:
Horizontal / Vertical tilable
Allows to change the image into a tile usable as a texture.
Uncheck if you want to delete an object in the image instead.
Fit output to bordering pixels
The object to delete being defined by a selection, the plugin will ensure that the edge of the texture fit what is around
Texture transfer
Allows you to specify two images that will guide the placement of the texture in the final image.
The plugin will search in the source texture pixels having similar colors in the input image and the output image.
The input image must have the same mode and same size as the image used as texture (Texture source).
The output image must have the same method and same size as the image to change, the current image. We use mostly the current image itself.
Map importance
The slider determines the importance with which must be taken into account these two transfer images (maps).
Sensitivity to outliers
Define a sensitivity. You may want to erase the differences or take them into account.
Now we will enter into practice, step by step, with images obtained at each step.
Building the binaries?
Worried
![]()
-Are you out of your mind?! Most people do not even know what a compiler is... And fewer than one percent have ever used one. Would you ever tell PhotoShop users to compile stuff? Most likely not, because you know that the program is aimed at ordinary people. Is GIMP not aimed at your Average Joe?
Webmaster
![]()
A new version of Gimp appeared that you use apparently and which made the plugin incompatible. Someone took over to develop it, but would not provide binaries. It is therefore necessary to recompile the source code for your system.
I would advise to keep the version 2.6 next to the 2.8 (it's not really worst) to use the original plugin that works perfectly.

